
Laser Cutters are great tools offering the possibility to create many different things. From simple boxes to engraving detailed graphics into wood or building complex three-dimensional objects.
In this beginners guide, I will explain the basics of how a laser cutter works, show you some examples of things that can be made with a laser and how to create designs for laser cutting or engraving. You’ll also learn which material can be used and how to get access to a laser cutter.
What is a laser cutter?

A laser cutter is a computer controlled machine that uses a laser beam to precisely cut or engrave material. A laser is basically just highly focused, highly amplified light. The laser beam causes the material to locally burn, melt or vaporize. The kind of material that a laser can cut depends on the type of laser and the specific machine’s power.
The term “Laser” is an acronym for “Light Amplification by Stimulated Emission of Radiation”. Laser technology was developed in the 1960s.
There are different types of laser cutters. This guide will focus on gas lasers and CO2 lasers in particular, as this type is most commonly used by hobbyists and small businesses. Other types are for example fiber or crystal lasers which are mostly used for industrial applications.
CO2 laser cutters are capable of cutting and engraving a wide range of non-metallic materials such as wood, paper, acrylic, textiles, and leather. For more materials and details look here.
How does a laser cutter work?

In a CO2 laser cutter machine, the laser beam is created in a tube filled with CO2 gas. Next, with the help of mirrors and lenses, the laser beam is directed to the laser head and focused on the material surface. Electronically controlled motors move the laser head to cut or engrave the desired shape into the material of the workpiece. The shape is defined by an input file which can be a vector or raster image.

When the laser hits the material, a very small area is heated in an extremely short period, causing the material to melt, burn or vaporize.
What can you do with a laser cutter?
In general, there are three tasks that a laser cutter can perform: Cutting, Engraving and Marking.
Cutting
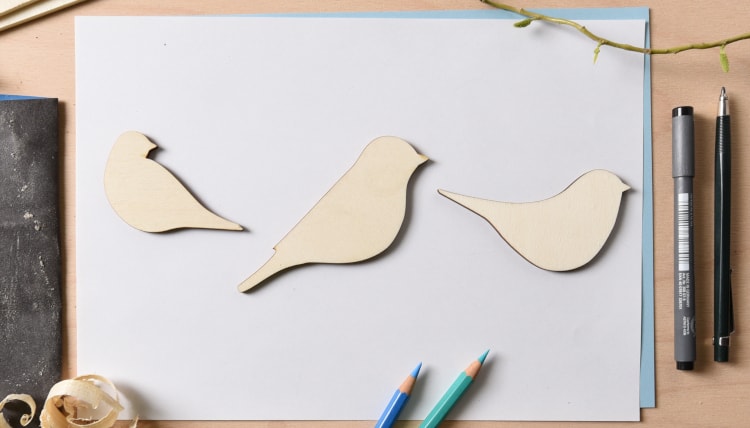
When the laser beam goes all the way through the material of the workpiece it creates a cut. A laser cut is generally very precise and clean. The look of the cut edges depends on the material. For example, the edges of cut wood are typical of a darker brown than the original wood. The edges of acrylic do not change color and have a nice glossy finish after laser cutting.

The kerf of a laser cutter is very small. The term kerf refers to the width of the groove made while cutting. This varies from material to material and is also dependent on the specific settings of the laser. For many materials, the kerf will be somewhere between 0.05 mm (0.002 in) and 0.5 mm (0.02 in).
Engraving
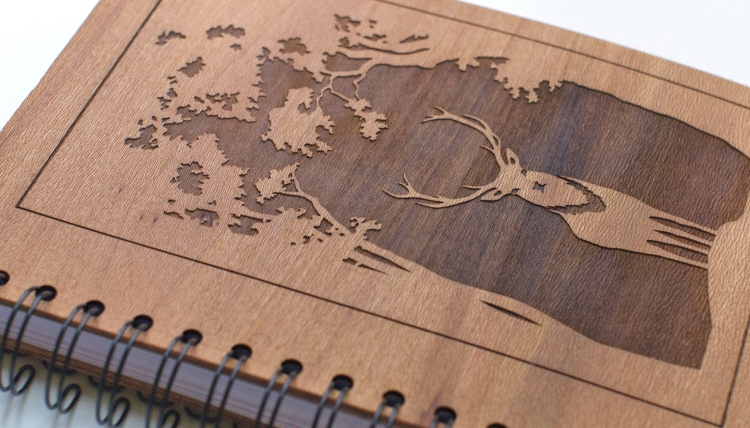
It is called engraving when the laser beam removes parts of the top material but does not cut all the way through the material.

Marking
Marking is when the laser does not remove material but for example, changes the color of the material. With CO2 laser cutters marking is mostly used when working with metals.
A marking solution (e.g. CerMark or Enduramark) is applied on the surface of the workpiece. After drying of the marking solution an engraving is performed. The heat from the laser bonds the solution to the metal, resulting in a permanent mark.

How to get started with laser cutting in 4 steps
So you want to laser cut your own design? Here’s a step-by-step overview of what you need to consider to make it happen.
1. Get access to a laser cutter
2. Choose a material to cut or engrave
3. Create your design
4. Cut or engrave it
1. Do I need to buy a laser cutter?
In many cases the answer will be no – you don’t need to buy a laser cutter. There are a lot of other options to get access to a laser cutter:
Makerspaces
If you are interested in getting some hands-on experience with a laser cutter, I recommend looking for a local makerspace. Makerspaces – sometimes also called maker lab or hackerspace – are collaborative work spaces for making and learning. They offer a variety of equipment like for example 3D printers, CNC machines, soldering irons and very often also laser cutters!
The big advantage of makerspaces is that the other people there are usually very helpful and they often also offer courses on how to operate their machines. There are many different types of makerspaces some are non-profit, others operate based on memberships or charge fee for the usage of equipment. Check out if there is a makerspace nearby. The site themakermap.com is a good place to start looking.
Schools, colleges and universities
Especially if you are a student, schools, colleges and universities are also a good place to look for a laser cutter.
Laser cutting services
The third option is using a laser cutter service. When working with a laser cutting service you just send them your files, choose a material and then the company will do the cutting and ship the finished parts to you.
Below you can find some online laser cutting services or just look for a local laser cutting shop.
- Sculpteo
- Ponoko
- Formulor (Germany/Europe)
- Cut Laser Cut (UK)
Buying a Laser Cutter
If you are just starting with laser cutting I recommend trying one of the options above before looking into buying a laser cutter to get some experience and find out which features are most important for you.
Even when looking only at CO2 lasers, there is a wide variety of different laser machines available and the selection is continuously growing. The price range is big, with entry-level Chinese imports starting at about 500 EUR/USD and professional grade machines costing several 10,000 EUR/USD.
In this guide, I won’t go into more details, but I plan to write an overview of the different types available on the market and the most important features to consider when buying a laser cutter, in a future post.
2. What materials can be cut or engraved with a laser?
CO2 laser machines are capable of cutting and engraving a variety of materials. However, there are also materials which cannot be processed. This may be because the laser can not cut through the material, or because toxic gases would form. Also, very flammable materials cannot be used.
Depending on the power and other specifications of the machine you are using, the maximal material thickness that can be cut will vary. The power of laser cutters is measured in Watt. Typical power levels range between 30 Watt and 120 Watt. Lasers with higher power are mostly used in industrial applications only.
| Material | Cut | Engrave | Comment |
| Wood | x | x | |
| Plywood | x | x | Lasers can struggle to cut plywood sheets with exterior glue. Use plywood with interior glue. |
| MDF | x | x | |
| Cork | x | x | |
| Cardboard | x | x | |
| Paper | x | x | |
| Leather | x | x | Use vegetable-tanned for best results |
| Felt | x | x | |
| Cotton | x | x | |
| Acrylic (Plexiglas) | x | x | |
| Delrin (POM, acetal) | x | x | |
| High-density polyethylene (HDPE) | (x) | (x) | Edges melt badly. Watch closely – easily catches fire. |
| Polypropylene (PP) | x | x | Melts somewhat |
| Granite | x | ||
| Marble | x | ||
| Slate | x | ||
| Stone tiles | x | ||
| Ceramic, Porcelain | x | ||
| Glass | x | ||
| Stainless Steel | (x) | Can be marked | |
| Aluminum | (x) | Can be marked |

Materials that should not be cut or engraved with a laser
There are materials that should never be processed with a laser because this will lead to the creation of toxic gases or dust which can also damage the machine.
These materials include (but are not limited to):
- Leather and artificial leather that contains chromium (VI)
- Carbon fibers (Carbon)
- Polyvinyl chloride (PVC)
- Polyvinyl
butyrale (PVB) - Polytetrafluoroethylenes (PTFE /Teflon)
- Beryllium oxide
- Any material containing halogens (fluorine, chlorine, bromine, iodine
and astatine), epoxy or phenolic resins
3. How to create a design for laser cutting or engraving?
Most CO2 laser cutters work very much like your everyday inkjet printer. The laser cutter comes with specific drivers which convert an image from a computer into a format that the laser cutter can read.
When working with laser cutters it is important to know the difference between vector images and raster images. Both image file types can be processed but raster images can only be used for engraving and not for cutting.

A vector image stores all the lines and colors as mathematical formulas. Raster images are pixel based. Which means that the image is made up of many small squares. Vector images can be scaled up without any loss in quality whereas raster images will start to “pixelate” at a certain enlargement.
Vector file types: SVG, EPS, PDF, DXF, DWG, CDR (CorelDRAW), AI (Adobe Illustrator)
Raster file types: JPG, PNG, GIF
You can use the software of your choice as long as you export your file in a suitable format. Below are some examples of graphic design software.
2D Design:
- Inkscape (free, open source)
- QCAD (free, open source)
- CorelDRAW
- Adobe Illustrator
- AutoCAD
3D Design:
- Autodesk Fusion 360 (free for hobbyists and small businesses)
- Blender (free, open-source)
- FreeCAD (free open-source)
- Sketchup
- Tinkercad (free)
- Solidworks
- Onshape
General settings
The first thing that should be considered is the size of your material / the maximal size that the laser bed can accommodate. This defines the maximum size of your design. In general, it is a good idea to set the work area to this size.
The color mode should be set to RGB. Different colors are usually used to specify different processes. For example, red could be used for all the parts that will be cut and black will be used for engraving.
Creating a file for laser cutting
As explained before, during a cutting operation, the laser fires a continuous beam at the material to slice through it. To know where to cut the laser machine needs a vector path as the input file.
Only vector graphics with the smallest possible line thickness (this depends on the software you are using) will be cut by the laser. All other graphics, like solid shapes or thicker lines, won’t be cut.
When cutting out text or other complex shapes you to consider that unconnected middle parts – like the inside of an “O” – will fall out. Depending on your desired design you may want to prevent this. For text you could, for instance, use a stencil font where all the inside parts of the letters are connected to the outside parts.
Creating a file for laser engraving
When engraving with a laser one can distinguish between vector engraving and raster engraving. Vector engraving is basically the same as cutting with the only difference that for the engraving the power is lower so that the laser just removes parts of the material and does not cut through.
For raster engraving, the input file can either be a vector file or a raster image. During raster engraving, the image is engraved by the laser line by line, pixel by pixel. The process is similar to the way in which an inkjet printer applies ink, but instead of ink being applied, material is removed by the laser beam.
Engraving works for simple shapes as well as for complex images. Photos need to be turned into grayscale images to be engraved.

4. How to use a laser cutter?
Once you have your design ready, it is time for the final step – the cutting on the laser. Laser cutters are very powerful machines. You can create great things with them but they are also potentially dangerous, so first a word of warning.
Before using a laser cutter always first make sure you read and understand all the safety instructions that come with it. In addition be aware that that wavelength of a CO2 laser is in the Infra-Red part of the light spectrum, so it is invisible to the human eye ye. The red dot you see with many machines on the material surface is only a positioning aid and not the laser beam that actually doing the cutting.
Preparation
First of all, check that your material fits inside the work area of the laser cutter and cut it to size if necessary. Also, be prepared to make some test cuts or engravings and bring some spare material with you.
You don’t necessarily need any extra tools when working with a laser cutter but in my experience, the following tool might come in handy:
- Utility Knife: For cutting material that wasn’t cut all the way through by the laser cutter or to cut paper and cardboard to size.
- Painter’s Tape/Masking Tape: Use it for masking the surface of your material to prevent burn stains and to tape down light materials.
- Measurement Tape/Calipers: For measuring dimensions and making sure your final objects have the right size.
Settings
The four most important settings of a laser cutter are power, speed, frequency and for focus distance.
- Power: Defines the output power of the laser. Typically can be set from 0 to 100% (maximum power). High power is used for cutting thick materials and lower power is used for engraving and cutting of thin materials such as paper.
- Speed: Determines the movement speed of the laser head. For engraving and cutting of thin material, the speed is usually set (close) to the maximum.
- Frequency (Hz, PPI): The frequency parameter specifies the number of laser pulses per second. Frequency depends completely on the material used. For example wood cuts best at around 500 to 1000 Hz and for acrylic 5000 to 20000Hz are recommended to achieve a smooth edge.
- Focus: As previously explained, there is a focusing lens inside the laser head. The focus point (where the laser beam is thinnest) should be on the material surface or slightly below, for most applications. To ensure this the material needs to be a certain distance away from the lens. The exact distance depends on the type of focusing lens that is used.
Many laser machines have a motorized bed which can be moved up and down to set the focus distance. Alternatively the position of the material surface a has to be manually adjusted.
So now that you have a basic understanding of the available settings you might ask yourself how to find the right settings for your projects? A good starting point is the laser cutter manual. Often you will find suggested settings for many materials. If you are working on a shared laser in a makerspace there are usually lists with recommended settings available.
Time to Cut!
Finally, you should be prepared to make your first cuts. It can take a few tries to find the ideal settings for your material.
Always change only one parameter in a test process. For example, start with the power by testing different values in 5-10% increments. Once your are happy with your results, don’t forget to write down your settings for future reference.
Useful Resources
- Instructables – Laser Cutting Class
- Laser Cutting Subreddit
- Great Youtube series about starting-up and using a laser cutter
- Collection of Online File Generators for Laser Cutting
Liked this guide?
Sign-up for the newsletter and stay updated on similar content!
Your missing not to cut ABS. ABS can break down into cyanide gas. Not the best thing for you.
Something to add to the “can cut” list is latex rubber. Stinks like hell but once you have the settings down cuts very nice.
Thanks for the input! Actually, I did some research regarding ABS and found mixed results. Some sources that state ABS should not be laser cut but there are also a lot of sources mentioning ABS as safe for laser cutting. I also found scientific articles saying that the combustion of ABS leads to the formation of hydrogen cyanide but this is also the case for organic materials like wood. I could not find any good info on the quantity of hydrogen cyanide that gets emitted from burning ABS. It looks like with a proper ventilation/filtration system ABS can be cut.
I have never worked with latex but I don’t have it on the list because in my local makerspace it is banned. The reason that is stated, is it releases a sticky smoke that ruins the optics.
[Edited 10.4.2019]
Nice work guys the info is clear and covers what i was looking for thanks again
Thanks for the feedback!
We are new to laser cutting and engraving and have a new led laser machine. We have research this thoroughly and cannot find an answer. What is the best product to have underneath the item that you are cutting. Since the laser when cutting might penetrate through the item what is recommended to sit the laser machine on? Thanks!
How do I get a training class in china on mdf and other cutting machine
There is also a great what to and to not cut/etch located here.
http://atxhackerspace.org/wiki/Laser_Cutter_Materials
Thanks for this info. It’s so hard to get comprehensive information for beginners!
Yes, when I wanted to start with laser cutting it took me quite some time to get an overview of what you can do and what you need. There is a lot of information online but often it is fragmented covering just certain topics and leaving out other information or it gets quite technical quickly. That’s why I decided to write this guide.
Thank you for this. We just picked up an Epilogue Zing and have no clue what to do with it. I downloaded some templates yesterday and also downloaded Inkspace. I really have no idea what to do with thwe multiple files received, how to open them in Inkspace and then send to the laser. Is there a tutorial on file management that you know of? I’m finding many articles, but they all seem to have the expectation that this part is understood. I have great ideas, but no way to connect dots 😕. I need a tutor….
I have a laser cutter and engraving machine and I am trying to find out how to develop my on projects. I can’t seem to get how to resize my project
thank you, nice share…
good share.. thank you
It’s good to know that there are different types of laser cutters that are used for different tasks. My brother is trying to get into laser cutting as a hobby for materials like acrylic and glass. I’ll pass this information along to him so that he can make sure he gets the right kind of cutter for the job.
Thank you for your tip to be prepared to have test cuts and to bring spare material. I am actually in need of having some laser cutting done. I think I will stick with using a professional service this time around.
I really liked your tip about making sure you read and understand all the safety tips before you or anyone working with you use a laser cutter. We were talking about laser cutters for one of my college classes one time, and I am really curious about how they work now. Personally, I believe that even a professional should always follow the most strict rules to make sure other people and themselves are safe.
It’s interesting that wood can be cut and engraved with a laser. One of my friends did some engraving for an art project, so I wonder if they used a laser cutter. Thanks for all the great information on laser cutters and their uses.
Yeah, wood is a great material to be processed with a laser. Chances are that your friends used one. But you can also engrave wood with other methods like a CNC or wood-burning pen.
correction to prior email….autocorrect changes Inkscape to Inkspace in my phone
Sorry
Would recommend FreeCAD as a design tool as well: https://www.freecadweb.org/
Thanks for the suggestion! I added FreeCAD to the list of design tools.
Hi
Where do you find stockists fir what you need machine materials etc.
Do you mean materials like wood or acrylic to cut?
Please help !
I’ve baught an Elekslaser
cutter / engraver but did’nt get any program with to install and operate above. Anybody that can help with a simple program that old people can operate. Thanks Johan
Hi Johan,
I’m not familiar with that brand. I found an old link to the EleksCAM software which might work: https://web.archive.org/web/20221002100156mp_/http://oss.eleksmaker.com/software/EleksCAM%20v3.1.zip
Alternatively you could also try if you can run it with a trial version of Lightburn (https://lightburnsoftware.com/).
Hom mutch cm must i set my laser from my plastic to cut for exapmple,
And how far from 3mm wood to cut?
I use a grbl laser 30 watt
Hi Paul,
I am not sure if I understand your question correctly, do you mean which power/speed settings to use?
No i mean witch distance in cm from the laser should the wood or plastic be?
Ah, okay. The distance will depend on the type of focus lens you laser uses. For CO2 lasers this will be typicaly between 1.5 and 4 inch (3.8 – 10 cm). You should check the description of your laser to find out which focus lens is installed. If for example you have a lense with a focal lenght of 1.5 inch then your material (e.g. wood) should be approximately 3.8 cm away from the lense.
For more information on how the set the right focus lenght have a look at this article https://k40.se/k40-laser-lens-mirror/setting-focus/
No i dont have co2 just a 30 watt laser.
So what kind of laser do you have? (I don’t have any experience with diode or fiber lasers)
O i lookt and they say between 2.5 and 5cm but now i ask myself when is best 5 and when best 2,5?
Kind Regards
I am afraid to find this out, you will have to do some tests. Have a look at the “ramp test” described at the end of this artikle: https://k40.se/k40-laser-lens-mirror/setting-focus/
Are there any laser cutting tutors in the UK (in and around London) please, who are able to give face-to-face (covid-safe) tuition?
Great info here, thank you! I am interested in learning more about different laser cutters and tips on purchasing the right one. Have you written an article on this yet, or have a website you would recommend with that information?
Thanks! I don’t have written an article on buying a laser cutter yet (is on my to-do list). I can recommend the laser cutting Subreddit: https://www.reddit.com/r/lasercutting/ A lot of good info there and also many threads on purchasing advice – it just might take some digging to find the info you want.
A first short overview of different laser cutters (sorted from most affordable to most expensive):
Good day any article on how to price your work properly?
ottima guida 🙂 perfetta per chi e alle prime armi 😉
Hello guys.
Thanks for the information.
I have an issue with my laser cutting a PCB. I cut thin layers of copper and I see splash of copper particles on the sides of the cut. Do you guys have any suggestion on how to avoid these splashes? Which parameter contributes the most? I have played with frequency (25-100kHz), and beam diameter(20-100um) and I am practically using the least power that can cut (3-4W).
Thanks,
I’m looking for a laser cutter that you don’t need a PC plug into the laser cutter,, but instead can use SD card, like on a 3D printer
Nice article, you didn’t mention ABS though that depending on the type will release toxic cyanide gas into the environment, not only will it kill you it will also eat all the electrics in your machine in weeks.
Hi, Glad to have found this site. 1 week ago was able to purchase a brand new TEN-HIGH C02 80W cutter from an auction. My guess is no one knew what it was as we bought it for 600.00 dollars. So we are new owners of a new project machine that is serious business. we have a few questions, there are no owners manual with this thing, any ideas you can send our way? even the 10-high web site is pretty vague.
We have been able to locate coreldraw and get the laserdraw to plug into the corel, have not hooked the machine to a laptop to see if it will all set up. Have used AI in past so understand basics of vector, imaging and raster. Still need to plug in compressor, water lines and the exhaust fans before turning on the machine.
Can you steer us in the proper direction of the learning curves for trial and errors. what do you suggest we learn first from you? and can you recommend any good reading in book form on the subject of laser machines, software?
Is there anything we need to know to prevent damaging the machine?
The Z axis is at least 12 inches, do we use this to set the laser head distance? or do we have a control for fine tuning the depth of the head on the software?
thanks for your time and the information on these pages.
Hi Casey,
I don’t know TEN-HIGH machines but an 80W CO2 for 600$ sounds like a great deal, congratulations!
I would try contacting the company, maybe they can send you the manual. For general info on the setup and operation have a look at https://k40.se/. Eventough the content is focused on the generic 40W chinese laser cutter, a lot of the info translates to higher power machines like you 80W. Youtube can you can also be a great source for infos.
A few general tips:
– safety first: check the machine for proper grounding (you are dealing with high voltages), set up the exhaust, never leave the laser running unattended
– check the alignment of the mirrors
– find the correct focus distance (some machines come with a spacer tool if none was included you can do a ramp test)
– start testing with cheap materials
– run test grids to find the best settings for cutting/engraving
– avoid running at 100% power because this will drasticaly shorten the lifetime of your laser tube
Hi,
I am new to laser cutting and engraving. I just purchased a 400mm x 400mm laser cutting machine. My questions is, Do I need a special table to put the laser on? how does it cut through thin wood and not cut the table it is sitting on? I do not want to cut through the wood table that the laser is on.
Thank you,
Mark
When cutting you normally want to elevate the wood by putting it on a honeycomb or pin board. This allows air flow below the material and reduces score marks on the bottom side.
If you don’t want to cut your table, I recommend putting the laser on a non-flammable surface (e.g. aluminum sheet or ceramic tile). Some people also use wooden spoil boards. Just be aware that these have a higher flame risk.
Also be aware that laser cutting will produce fumes and smoke. Only use the laser in a very well ventilated area or with an enclosure/fume extraction.
Hi,
This was a very informative post, thanks so much for taking the time to write it. I discovered that my local library has a makerspace with a 40W CO2 laser engraver/cutter. I am actually interested in cutting metal (which seems to not be among the materials the cutter can cut actually) – but very thin metal between 24 and 28 or even 30 gauge. Is this still possible? I am thinking of steel, brass or copper sheet.
Thanks,
Monica