I love puzzle boxes and I wanted to design my own puzzle box since I started with laser cutting. I am not exaggerating when I tell you that I have a list with a few dozen ideas for all kinds of puzzle boxes with various mechanisms. But I learned in the past the hard way that it is generally a good idea to start simple when doing something for the first time.
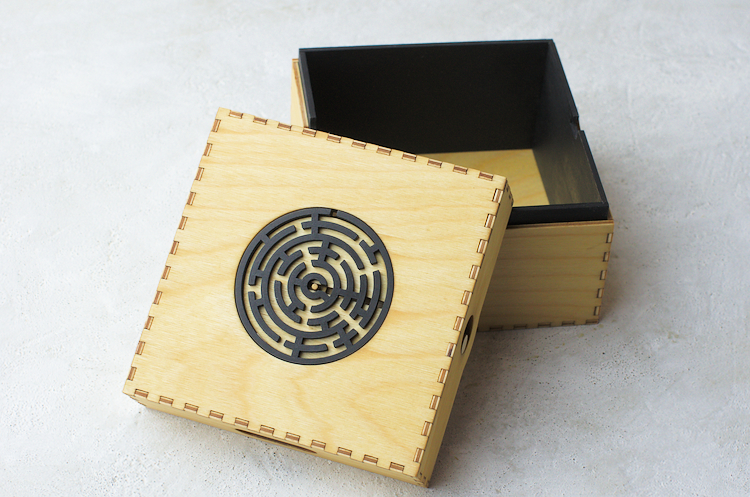
So I resisted the urge to design a really cool, complicated mechanism and settled on something simple yet elegant (at least I hope that is what it will be…). I will call it the “Apprentice Maze Puzzle Box”.
Material:
- 3 mm Birch Plywood
- Sandpaper (180/320 grit)
- Wood Glue
- Black paint (I used milk paint)
- Linseed oil (optional, used as a finish)
Tools:
- Laser Cutter
- Orbital Sander (optional, the sanding can also be done by hand)
Concept
The difficulty of this puzzle box will be fairly easy. I probably would rate it a 3-4 on a scale from 0 to 10. If you don’t want to know exactly how to open the box, don’t read the following paragraph or watch the video. But if you read through the instructions and build the box, it will be pretty obvious anyway…
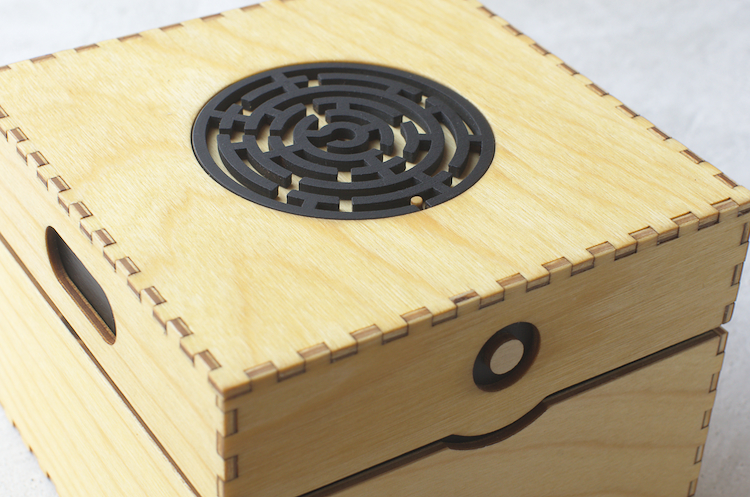
How to open the Apprentice Maze Box
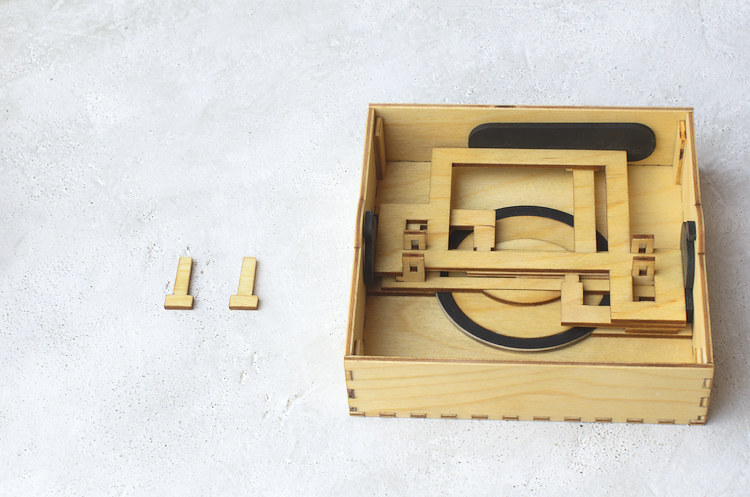
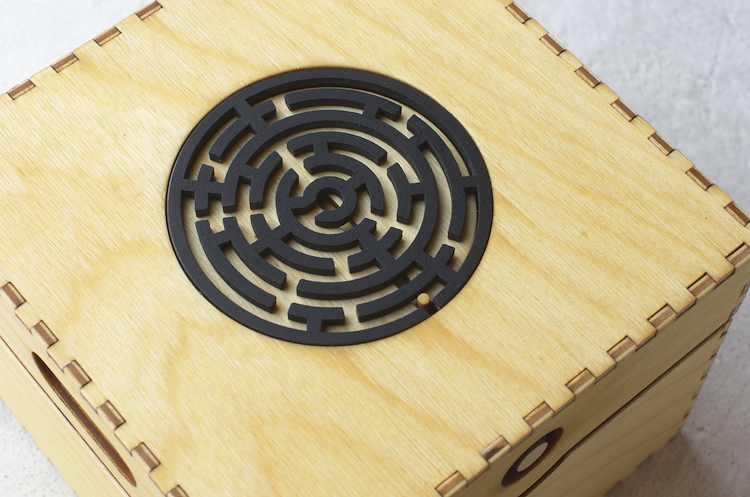
As the name suggests, the main element to open the box will be a maze located on the top of the box. The maze can be rotated and there is a little pin inside the maze. The pin can be moved with the help of a slider on the front of the box. By rotating the maze and moving the slider, the pin can be navigated through the maze. Once the pin is in the center of the maze, two circles on the left and right side of the box are free to move. One circle has to be moved back and the other one forward. This unlocks the top lid and the box can be opened.
Modeling the Mechanism in 3D
After I sketched out some ideas for the locking mechanism on paper, I used Fusion 360 to create a complete 3D model of the puzzle box. This allowed me to test if all the interactions were working as planned and make adjustments in case they did not.
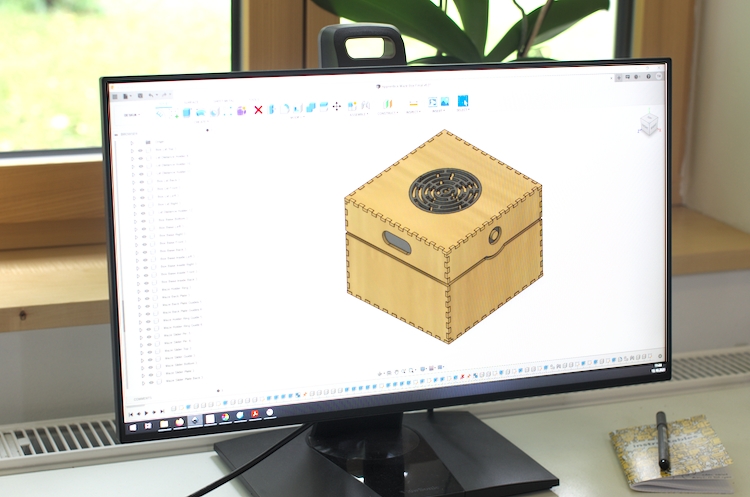
Each part that will be cut on the laser is modeled as a separate component. Once, I had all the parts modeled and was happy with the design, I copied all components and laid them out flat using a planar joint. Then I used the CAM module in Fusion to create the paths for cutting and exported them.
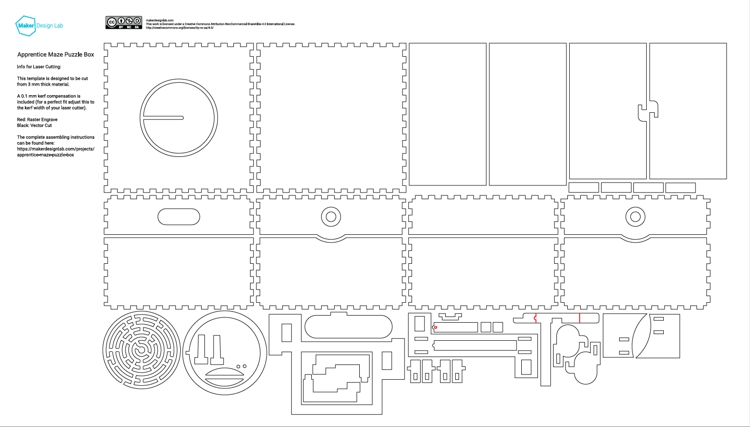
Using the CAM module has the big advantage that the kerf compensation will be automatically done, one just has to choose the right value for the kerf. For more details about the workflow, have a look at this video: Fusion360: DXF export with kerf compensation for laser cutting
Below you can download the cutting template as PDF or SVG.
NOTE: The locking mechanism requires tight tolerances to work smoothly. Therefore it is important to consider the kerf width when cutting. By testing different settings I found that a kerf compensation of 0.1 mm worked best for me (and this is included in the templates). But this depends on the type of laser machine and material you are using. I recommend adjusting to your kerf width before cutting for the best results.
If you don’t want to use 3mm wood, read this post on how to rescale for a different material thickness.
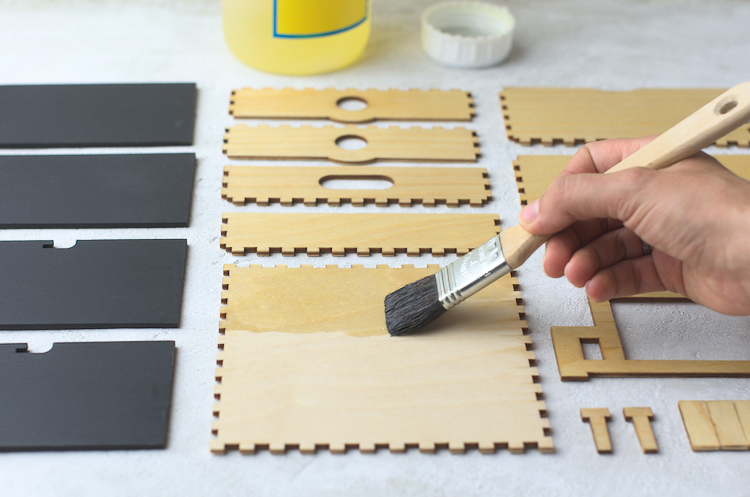
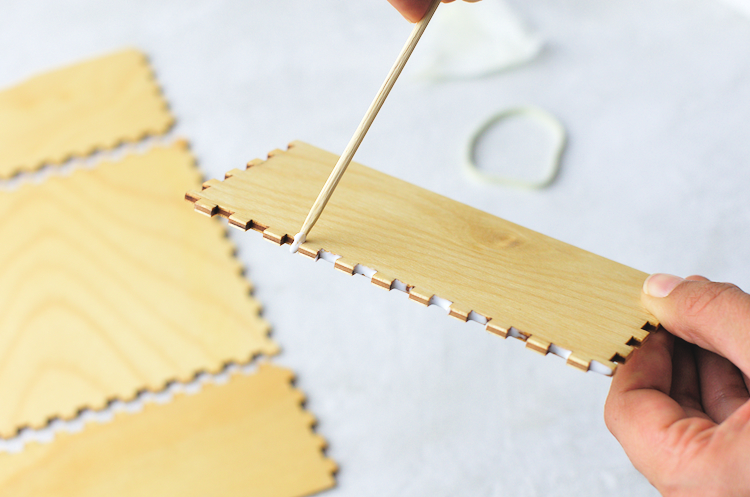
Preparation of the Material
Currently, my favorite workflow is to sand the top and bottom surface of the wood and add masking tape before the laser cutting.
Sanding the complete panel in one go is much quicker than sanding the individual parts afterward. I also find that the masking tape holds on better to the wood when the surface is smoother. Just make sure to get rid of all the sanding dust before the masking.
Laser Cutting and Engraving
I cut everything on a Trotec Speedy laser cutter at my local makerspace. On two parts I used engravings to exactly mark the position of other parts which will be glued on top.
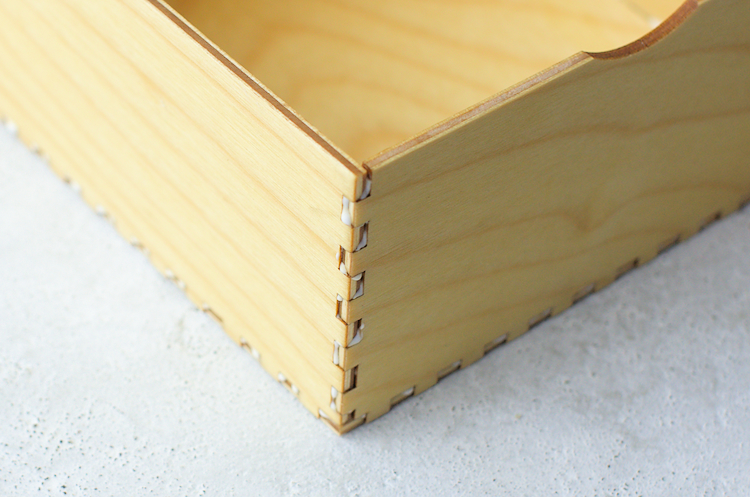
Sanding, Staining and Oiling the Wood
I do not like the look of laser burnt edges on boxes, so I designed all the finger joints of the box to be 0.3 mm (0.01 in) longer than necessary to have excess material that can be sanded away.
As I already sanded the wood surface before laser cutting, there was not much additional sanding needed there. I just did a final light sanding with 320 grit and then proceeded with staining and oiling.
On all the parts that will not be stained I applied a coat of linseed oil.
I used milk paint for the black parts. It was my first time using milk paint and overall I really liked it. It gives very good coverage and is easy to apply. One thing I did not consider though is that the milk paint needs to be sealed because otherwise it will rub off from the moving parts and stain the parts it is in contact with. Luckily I had some clear spray lacquer at home and two thin coats fixed the problem.
Assembling the Box Lid
Below you find a short description of the assembly steps. Please also refer to the pictures in the image slider to see which parts are needed for each step and where they need to go.
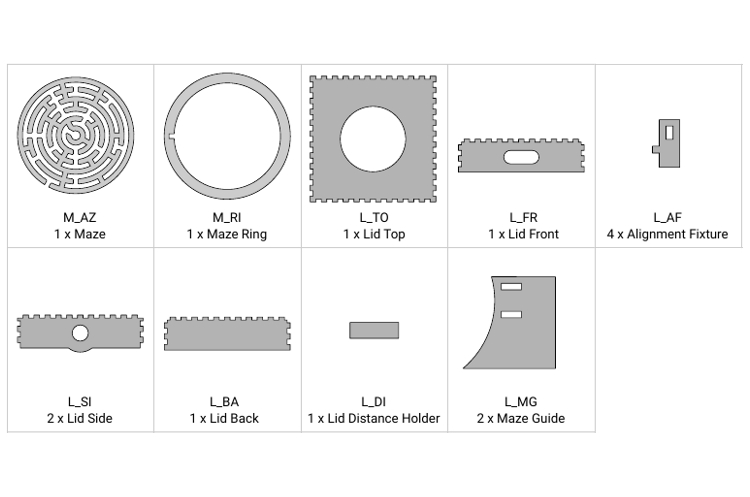
The complete part overview and all the assembly drawings are included as PDF document when you download the cut template above.
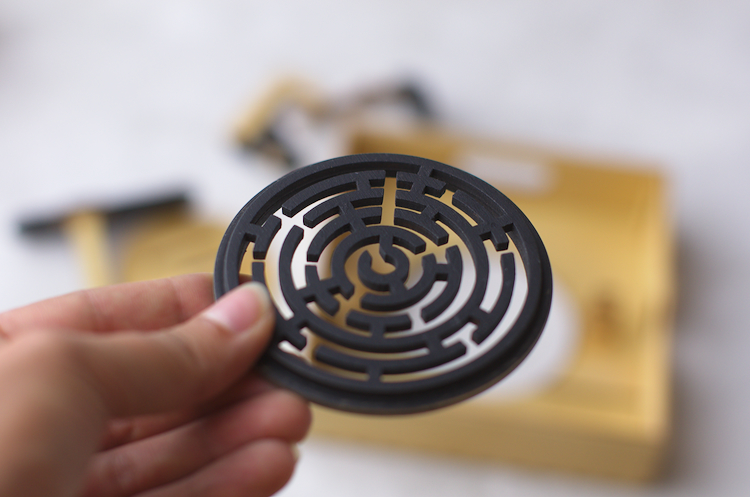
- Glue the maze (M_AZ) and the ring with the small cutout (M_RI) together. Make sure that the cutout on the ring and on the maze align.
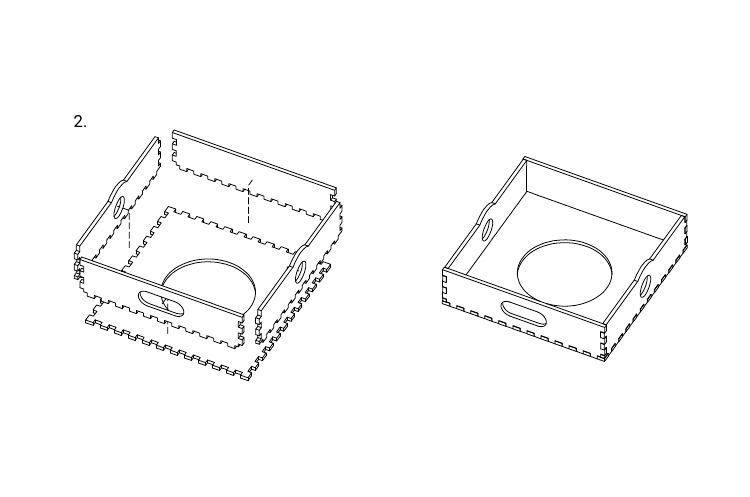
- Glue the four wall parts (L_FR, 2 x L_SI and L_BA) and the top of the lid (L_TO) together.
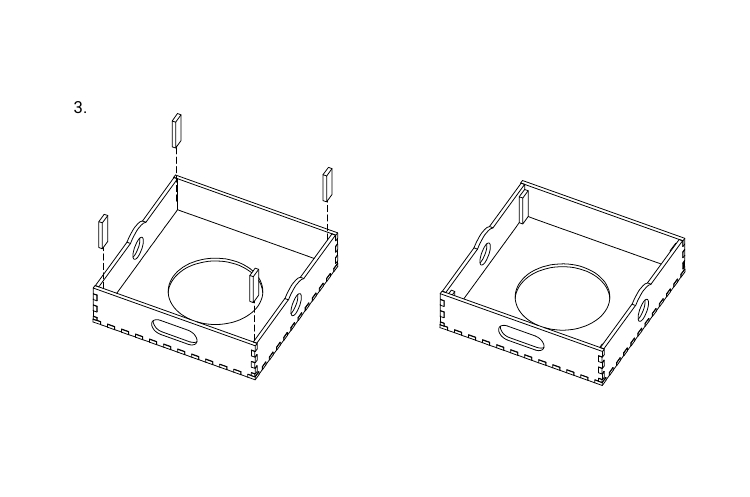
- Glue the four distance holder parts (L_DI) to the side walls with the circular holes.
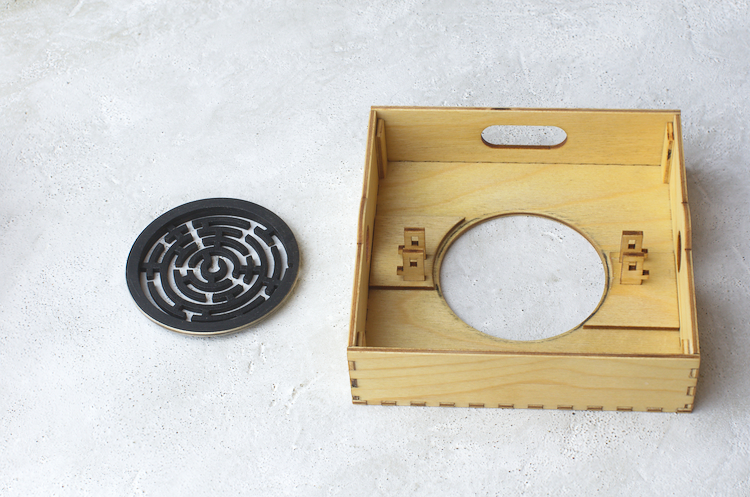
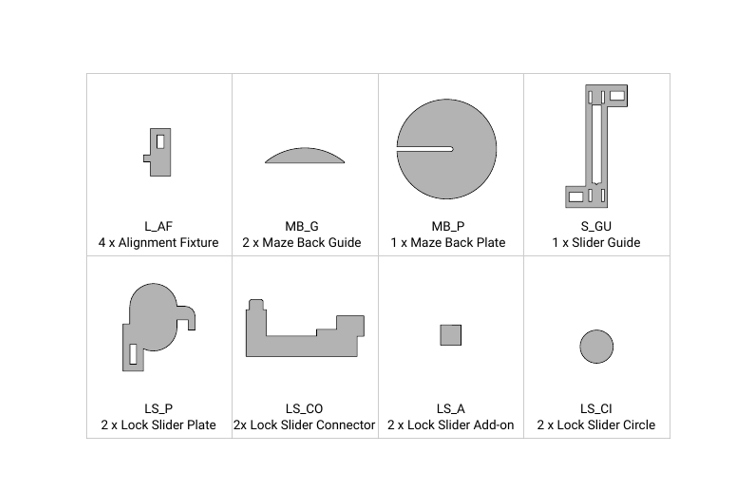
- Place maze and check if it rotates freely (sand the hole if it doesn’t). Next combine the parts L_AF and L_MG as shown in the drawing. Glue the parts L_AF and L_MG to the lid using the maze as a guide for placement. Make sure that the maze is still rotating freely.
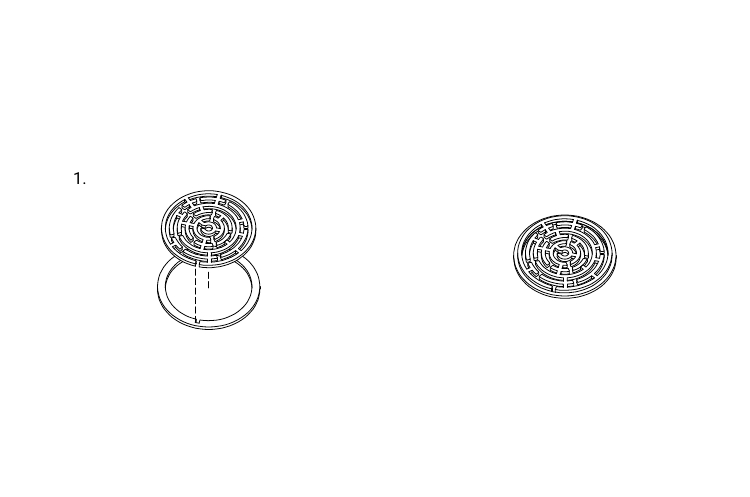
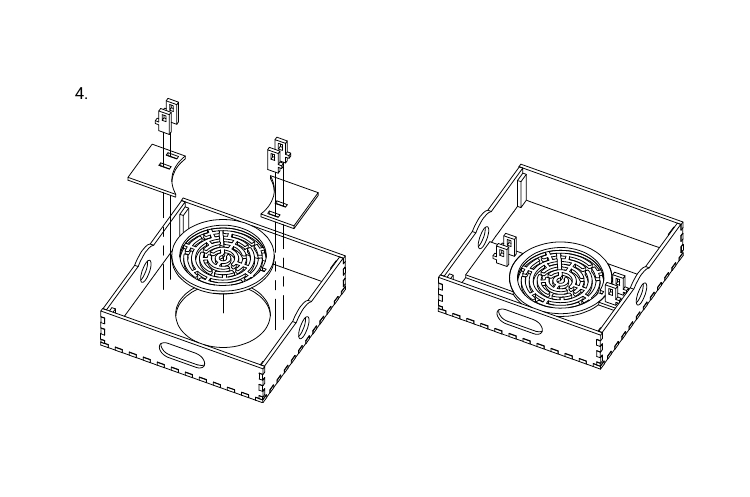
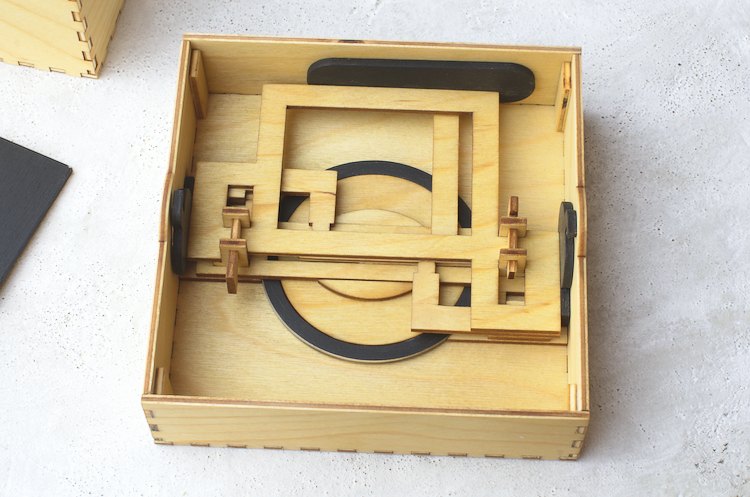
After successfully completing the steps above, your lid should look as pictured below:
Assembling the Lock Mechanism for the Maze Puzzle Box
After completing the lid, continue with the lock mechanism.
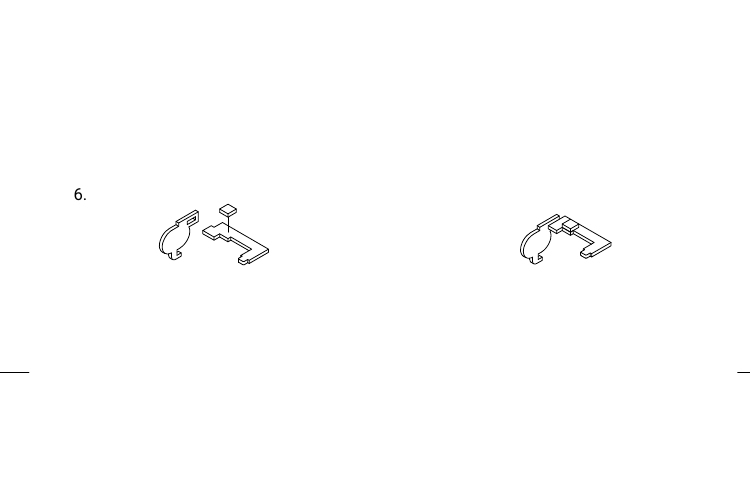
- Glue the two MB_G parts onto the maze backplate (MB_P) using the engraving as a guide. Then place them on top of the maze. Next place the slider guide (S_GU).
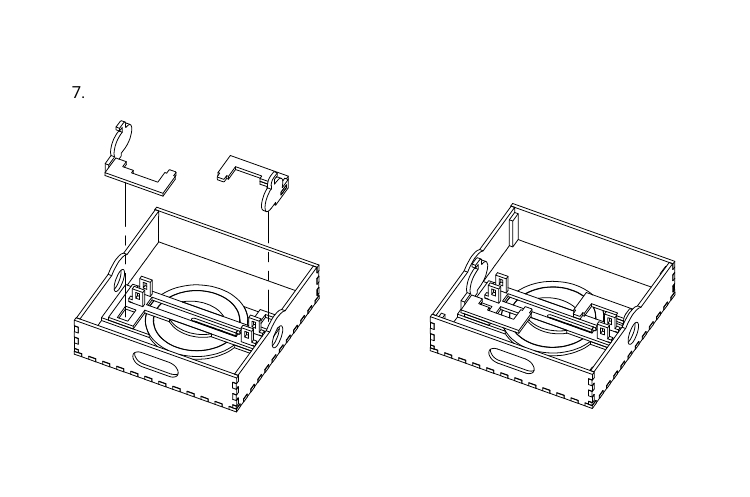
- To make the two sliders which are locking the to box, glue parts LS_P, LS_CO and LS_A together as shown in the drawing.
- Place the two lock sliders so that part LS_A is in the rectangular cutout of the slider guide (S_GU).
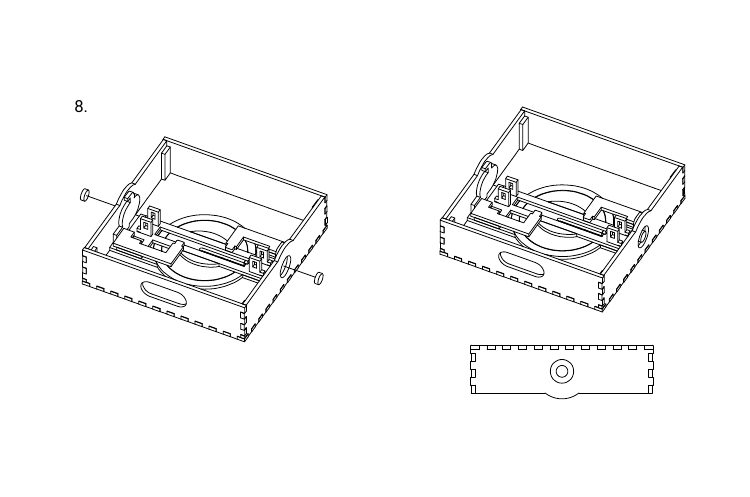
- Make sure the lock sliders are moved all the way outward (in the “locked” position”) and then glue the circles (LS_CI) centrally on the slider plates (LS_P)
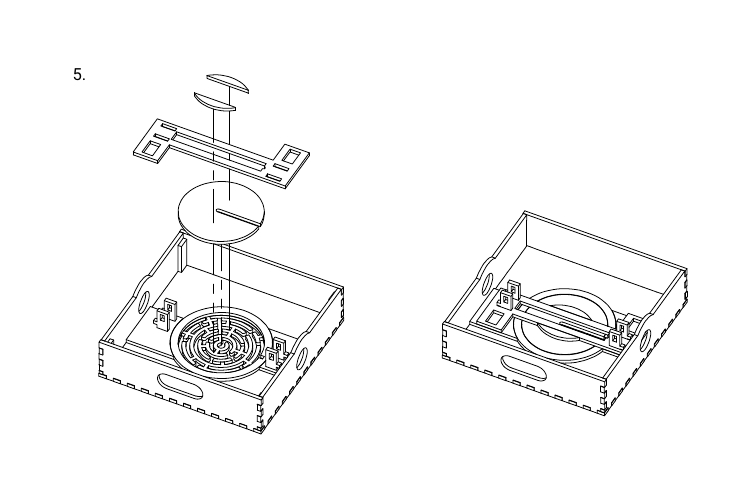
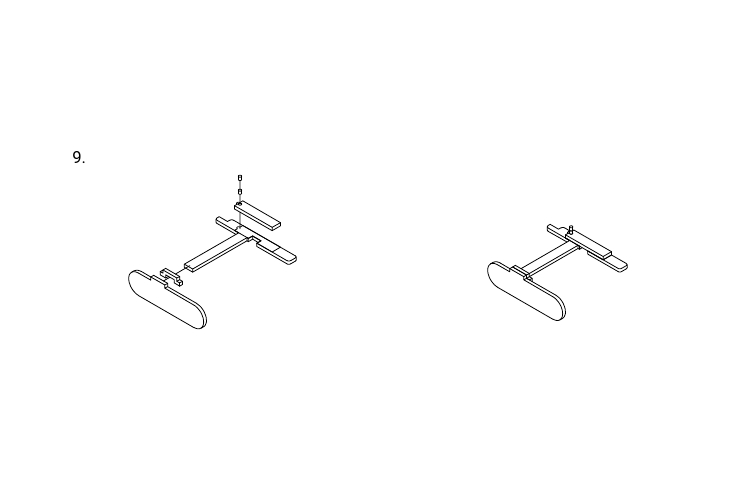
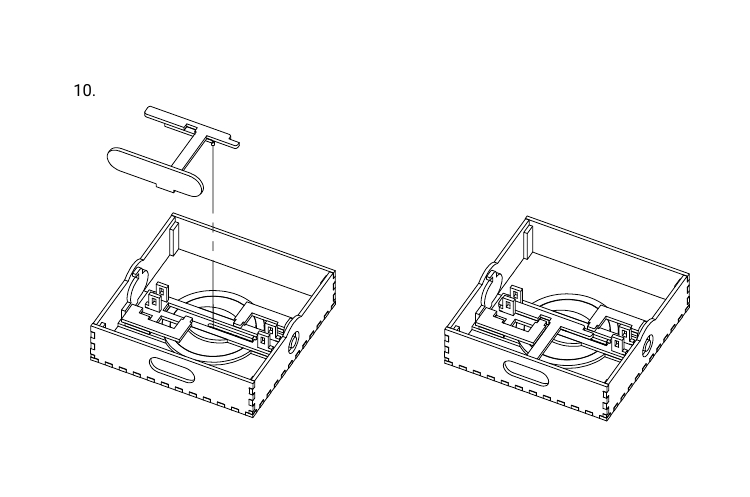
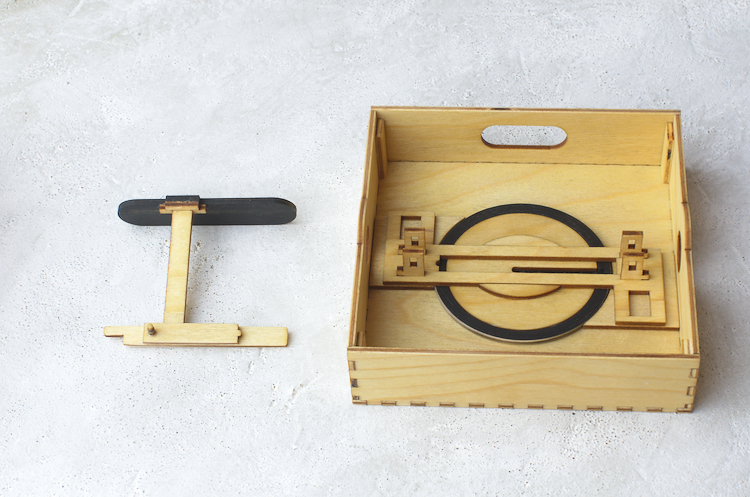
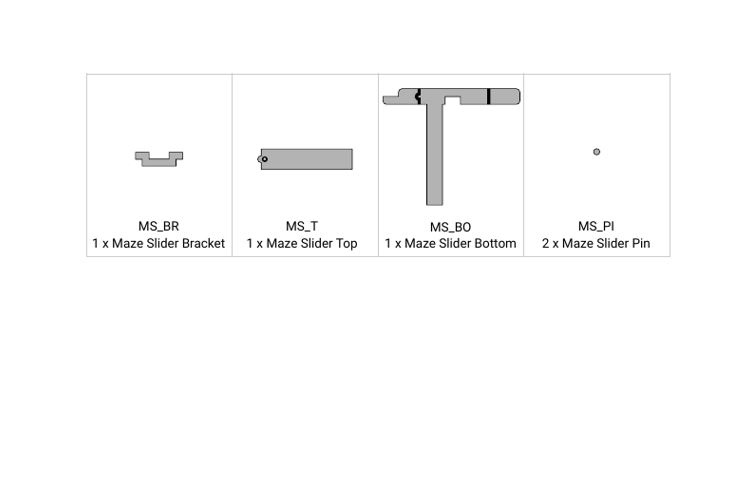
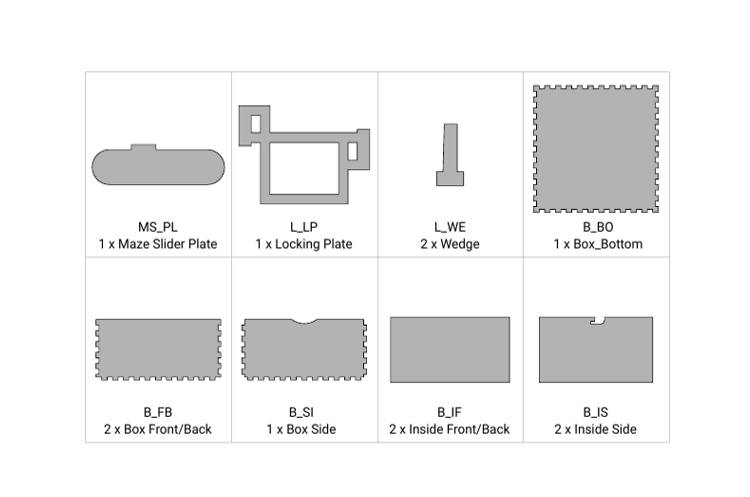
- Next, assemble the maze slider. Glue the parts MS_BR, MS_T, MS_BO, and MS_PL together. After the glue has dried for these parts, glue the two small pins (MS_PI) together and then on part MS_T. Use the engravings for placement.
- Place the maze slider in the slider guide. The pin should be in the center of the maze.
- Add the locking plate (L_LP) on top and fasten everything using the two wedges (L_WE)
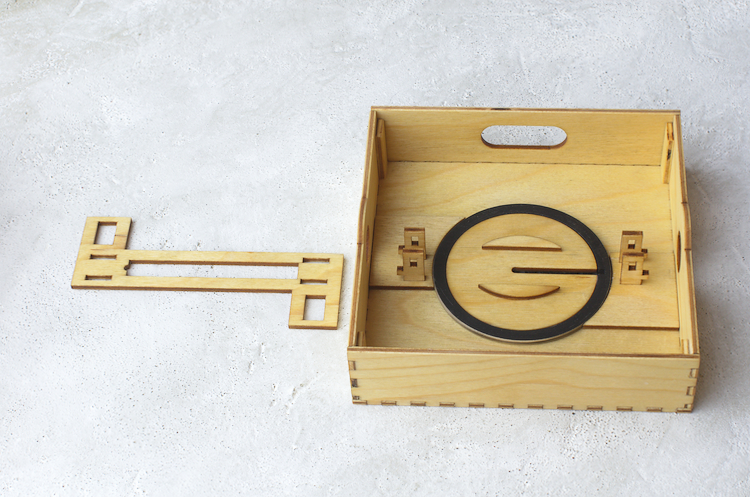

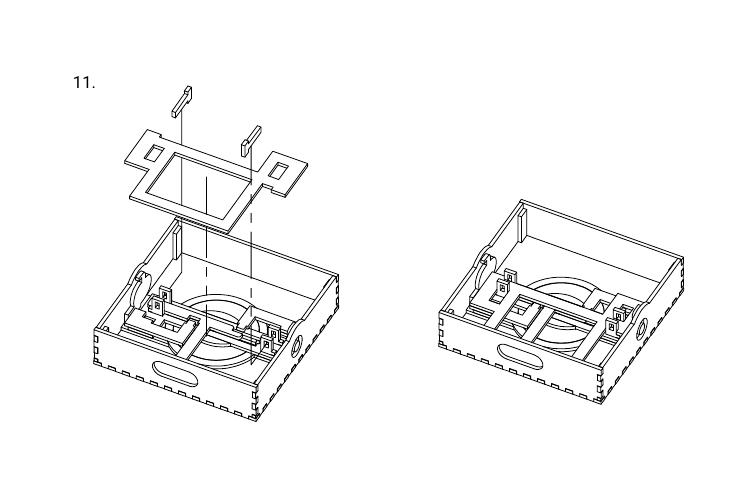
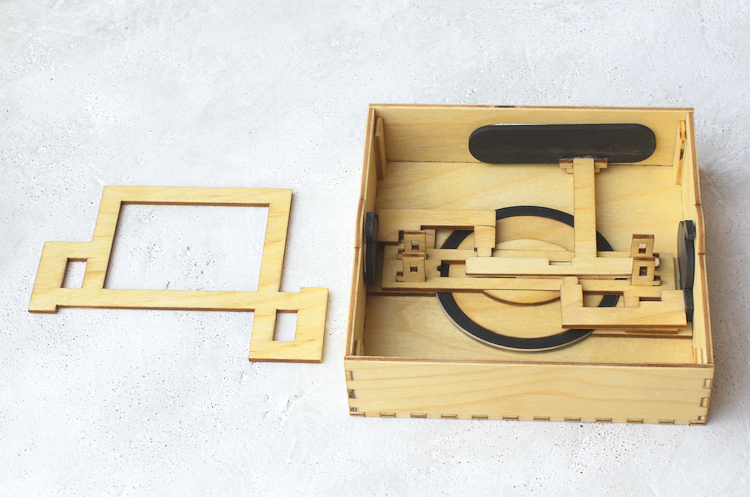
When you have completed the assembly of the mechanism, you should test if all sliders move easily. All the moving parts of the mechanism are held in place with the help of wedges. This way it is easy to fine-tune all moving parts.
Originally the tolerances on the maze slider were a bit too tight and I had to sand down the edges for smooth movement. I corrected this in the downloadable template so only small adjustments should be necessary.
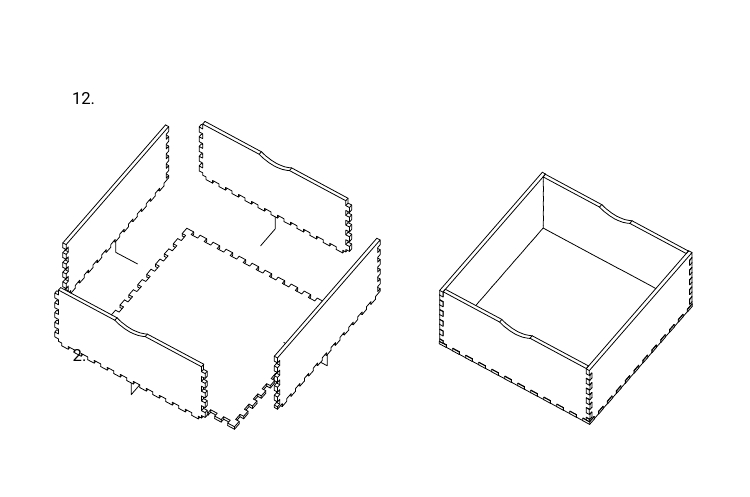
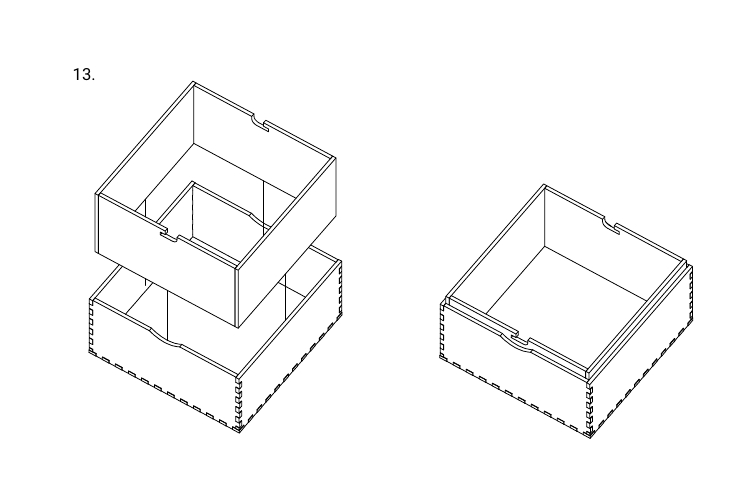
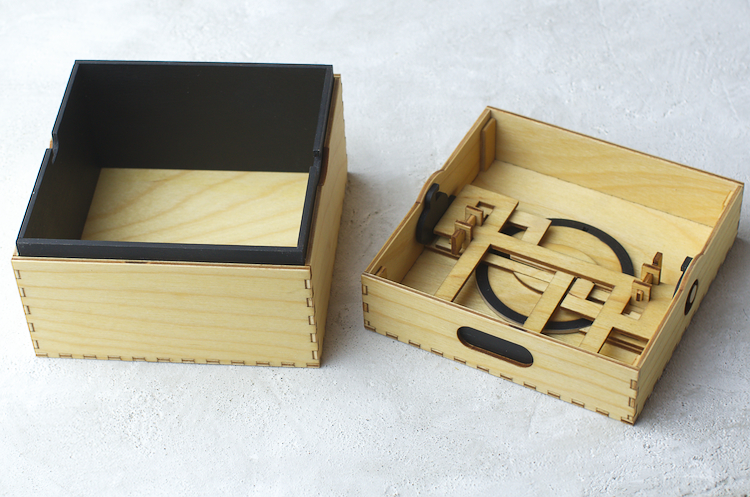
Making the Bottom Box
The last steps are to make the bottom box.
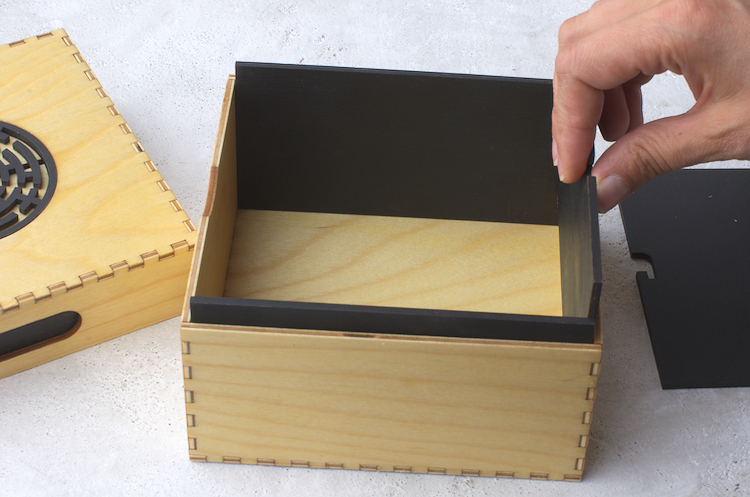
- Glue the four wall parts (2 x B_FB and 2 x B_SI) and the bottom of the box (B_BO) together.
- As the final step glue the four inside walls (2 x B_IF and 2 x B_IS) in.
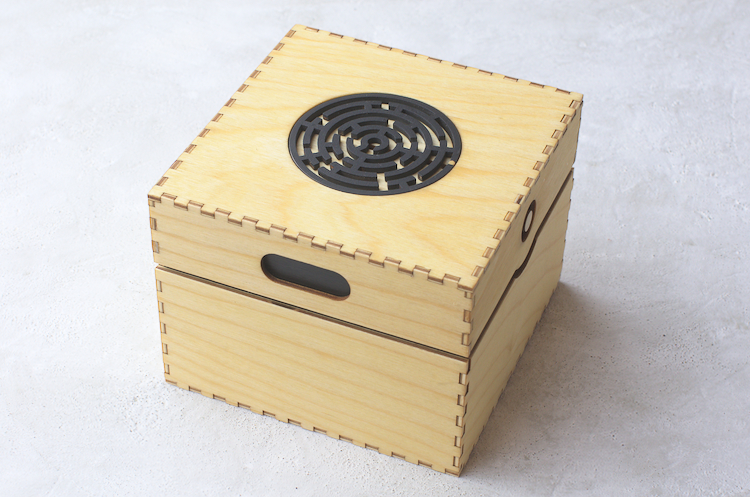
Putting It All Together
The only thing left to do now is to close the box. To do this make sure that the maze pin is in the middle of the maze and the lock sliders are in the “unlocked” position (pushed outwards).
After putting the lid on you can move the two lock sliders on the sides to lock the box and then navigate the pin in the maze all the way outwards.
Now the maze puzzle box is ready to be given away to somebody to figure out its secret!
If you make your own box following this tutorial I would love to hear from you! 🙂
Liked this Post?
Sign-up for the newsletter and stay updated on similar content!
Love this. Thank you so much for sharing! I think some of the instructions(or the images) might be mirrored, or maybe I was just not paying full attention and glued wrong. Took some trial and error, but got it together moving smoothly in the end.
Is there any chance you could make one around half the size?(only the box itself, the maze puzzle is a good size) I would love to make this as christmas gifts for friends and family, but the size is a little big on my beamo and requires quite a few boards of wood per box. No worries if it is a lot of effort for you, just thought I’d ask.
Keep it up!
Happy to hear you made your box! 🙂
I just checked and you are right – some of the images are mirrored. I will correct this in the next days.
I made a second version of the cut file, where the bottom box is only about half the original height:
https://makerdesignlab.com/download/apprentice-maze-box-v2-small-svg/ This should save you a few boards.
What’s your experience with the beamo? I am playing with the thought of buying my own laser (currently using one at a local maker space) and the beamo or the beambox look interesting…
Thank you so much! Will do a new testprint when I have some time.
I must say I do like the Beamo so far. I was also using a cutter and my local maker space, but due to corona they closed doors for the time being and that made me order the Beamo. The small cutting space is a little annoying, but the small size is practical in terms of the space needed for the machine itself. The laser is powerful enough to cut through 3mm wood in a single pass, but any thicker and it struggles a bit. It is not fully plug and play and some problem solving must be expected. If I had the extra money I would probably go for the Beambox, but for now the Beamo covers most of my needs.
Thanks for the info!
Hi! I do not have a printer or any of the tools necessary to cometiste this but would love to make this box. Is there anyway I can pay you to print these items and ship them off for me to construct it ? This would make a great gift.
( this box but the model you have that is half this size) I understand if this cannot be done but appreciate your consideration—-
Hi Shania,
I wrote you an e-mail in reply to your comment.
Thank you very much for sharing! Enjoyed your writing style and instructions. Looking forward to building one!
Thanks! As a non-native English speaker, I am always a bit worried if my writing is good enough and that the instructions are clear. So this means a lot to me 🙂
Yes, I also thought some of the photos were inverted when compared to the diagram.
Made on out of 5mm ply. Just upscaled the whole thing by 166% and it works perfectly. A little sanding for smoother function and tight fits but amazing as a whole. And large! Cut on my Glowforge.
Thanks!
Wow that’s a big box 🙂 Great to hear that everything worked for you!
hi there can u share the file with us plz
What are the overall dimensions? My software isn’t importing into the template at the size you need so I am having to correct the size. Please help?
The dimension of the bottom box part in the template is 138.7 x 138.7 mm the height of the bottom box is 66.4 mm. I think I will include a scale reference in future templates.
Looks awesome and just tried for myslelf. Noticed the pattern of the finer joins on the front of the cover do not line up with the lid. Will adjust for the next attempt for a better finish. Excellent work btw 😉
Thanks! You are right the small tabs are different on the lid – good eye for detail 🙂
What are the dimensions of the plywood sheet you used to cut the box from?
The sheet was 3 mm thick and the area needed for all parts is approx. 60 x 35 cm (24 x 14 in).
Hi,
Great project.
How do I make this work with 3.6 mm thick material?
I can’t find 3 mm where I live, and I would like to make this box to my mother who is in the hospital due to a stroke.
Do I use any cad software to change the size or is there anybody who can point me in the right direction. 🙂
Regards
Glenn
Hi Glenn,
the easiest way to make the box out of 3,6 mm material is to upscale all parts to 120% (because 3,6 is 20% thicker than 3 mm). Just note that of course, the final box will also be 20% bigger.
Best wishes to your mother for a speedy recovery!
Theresa
Hi Theresa,
Thanks for the reply and I mange to make it by do the size x 1.333 then I got it right.
My mother is much better, thanks for your wishes!
Best regards
Glenn
Thank you for your time and talent! Just finished making the box, it went to together easily using the well written instructions and drawings. I really like the proportions of the box overall and the design of the bottom box with lid inserts.
Thanks! Great to hear that the instructions worked for you 🙂
Absolutely Fantastic – Instruction and design
Thank You
Hello I just made the box but the movement is too tight i cut it as the measurments do you recommend i sand it or how do i make the movements smoother?
Yes, I recommend sanding the parts to make the movement smoother.
Ein schönes Projekt. Habe es mit einer 3mm Mdf Platte gebaut.
Dieses Material ist dafür leider nicht geeignet. Das Labyrinth verbiegt sich beim Drehen. Besser ein etwas stabileres Material verwenden. Den Ovalen Schieber habe ich mit einer zusätzlichen Leiste eine bessere Führung eingeleimt. Man kann etwas mehr Druck auf diesen Schieber ausüben.
Vielen Dank für das Feedback! Schade, dass es mit dem MDF nicht funktioniert hat…
Hallo,
eine tolle Herausforderung und technische Konstruktionsleistung. Ich vermute aber, dass die Unterbauzeichnung einen Montagefehler aufweist. Die Verschlussgänge scheinen Seitenverkehrt dargestellt zu sein. Muss ich nochmals machen. Ich wünsche mir noch weitere Technikmodelle dieser Art.
Herzlichen Dank und Grüße
Michael
Hallo Michael,
vielen Dank für dein Feedback! Kann sein, dass sich bei den Bildern ein Fehler eingeschlichen hat. Muss ich mir nochmal genauer ansehen.
(Ich arbeite gerade an einer Puzzlebox mit einem anderen Öffnungsmechanismus. Bis zum Ende Februar/Anfang März sollten die Pläne + Anleitung fertig sein.)
Liebe Grüße,
Theresa
I agree opening the box is easy.
But I think it can be made much harder, if you can an extra circle, the size of the maze and glue that on top of the existing maze. That way, the maze itself is no longer visible.
I have not tried building it myself, but I am posting because this idea might be usefull to someone someday.
Kind regards,
FoldingFan.
Nice project, thank you for providing the files and instructions.
I wanted to gift it to a friend for his wedding and got the idea to search for something like this only a few days before the date. I only had 1.8mm wood at home, so I downscaled everything to 60%. This worked beautifully for the most parts.
Here my building experiences:
– I soon started switching between a universal glue and instant adhesive for different parts
– The tolerances where so small I could sometimes skip glue and just press the parts together. E.g. in step 6.
– I too got confused by the mirrored images after step 10. Maybe it would be good to add a note to take care of the alignment of MB_P in regard to the elongated hole in the box.
– A picture for “Paint these parts black” would have been great. But it was not difficult to figure out.
– The tolerances where to tight for the mechanism with the downscale. With some waxing and some sanding I got the lockers working, but even then the slider could barely be moved from inside the box, From the leverage point of the plate the force would be greater then the strength of the wood beam.
– The small pin kept breaking. I replaced it with a toothpick tip and would recommend this even for a larger build.
In the end the Box still looked very nice and I simply rested the pin in the middle of the maze, having it serve as decorative element. The only challenge for my friend was now to figure out how he had to move the somewhat stubborn lockers without breaking the delicate wood 🙂
Thanks again for the files,
Roger
This is such an amazing design. I had a lot of fun assembling the locking mechanism and tuning it. Here’s hoping for the next level from your book. The ‘journeyman maze puzzle box’ if you will
Thanks! I have two puzzle box designs I’m currently working on. One has a mechanism that’s simpler to build the other one is more complex with multiple mechanisms.The simpler one is almost ready. I’ll probably post it in a few weeks.
dear makerdesignlab
in het svg bestand is de blauwe lijn ook een snijlijn?
het is een geweldig design. ik geniet er echt van.
dank je wel voor dit bestand
Love your designs. I know most of them are from a few years ago….but still great work!
This was a fun build. I used 1/8″ MDF (scaled using your handy calculator!) and it went pretty well. I got confused a couple of times about which side of certain pieces gets glued to – this was exacerbated by flipped photos with steps 5-11, but I finally got there after cutting a few pieces I’d messed up.
A big point of frustration was with the pin(s) for the maze, which kept breaking. I ended up using a small (1/2″) gold nail from a picture hanging kit. It’s more robust and adds a nice touch of elegance to the maze.
Another minor frustration for me is with the maze itself, which is hard to turn in places. I haven’t worked out where it’s jamming up, but it turns nicely before it all goes together. Something to pay attention to in my next attempt.
Finally, I found that trying to move the pin with the side opening just wasn’t working for me because there’s not much friction to move the mechanism. Adding a button like on the lock sliding plates might help, but I’ve found that using the nail I replaced the pin with is smooth and simple. I’ve opened and locked the box a dozen times already, I learned a lot and had a lot of fun building this box. Thanks for sharing it with us all!